Forums at last

Forums at last

It’s been really fun running multiple websites and writing about some of my experiences. So I decided to stand up a forum. The link is part of the nav menu but here you go FORUMS.

I write a lot of technical documentation and sometimes I sanitize what I take from my own wiki or experiences and post them to the public. I think forums are a better way to interact with people and answer more technical questions.

Now time to transcribe all my stuff. See you there.

Guide: Installing Windows using WDS and MDT

Guide: Installing Windows using WDS and MDT


Who is this for?

This guide will target more lab oriented users. Some basic skills are assumed like installing an operating system will be assumed. Unlike other guides on the forum this specifically may interest those in or wanting a job in IT. Regardless of if you use these technologies in a corporate environment playing with them on your own can help you get familiar with technologies and concepts people use everyday to get paid. With the added bonus of doing something fun on a Saturday. Overall this guide is not about if you should. It is about if you can do something and try to have a little fun in the process. It may look complex at first because I am really verbose sometimes, but this is all free and wont cost you a dime to learn something new.

Read about it in the Forums.

Arc A380 First Impressions

Arc A380 First Impressions

Hey everyone! Got my Arc A380. This one is the “Asrock Challenger Arc A380”.

This review isn’t one like you might expect, part of that is the energy I want to spend on it and the other is I want to try and focus on usability. This will be a usability review for a normal person installing the GPU. Some fun tidbits and oddities will be explained as we go along.

Read more about it on the Forums.

Bacula blah

Bacula blah

Gave RHEL a test now that they allow 16 licenses with a free developer account and decided to install Bacula. After which I installed Baculum. I received a ton of php errors complaining about authentication and wasted about an hour looking at various guides.

I found in some obscure documentation that the API Baculum uses to talk to the Bacula console has its own GUI setup on port :9096. Sure enough the page loaded. I configured that and was finally able to get communication working from the main Baculum GUI on :9095.

The interface is meh at best, but it’s worth learning I guess. I like the fact that it doesn’t rely on headers to backup systems, but I haven’t figured out how to process a BMR yet. Soon.

ScreenConnect Woes

ScreenConnect Woes

Oh, where to begin? Like most of the IT industry and home lab enthusiasts I was drawn in by ScreenConnect the now defunct remote software company that was bought out by ConnectWise and renamed Control. When I first came across this server it was initially configured on a Ubuntu 14 desktop environment.

I wanted this to become a production system and with the delicate Mono config decided to try my luck converting it. This caused me some grief but I did not know what I know now about Ubuntu or even Linux in general in 2014. After removing the gnome desktop environment it lived like this for a few years with problem after problem that was slowly patched and fixed.

Enter connectwise. Connectwise bought SC and turned it into Control. This was of no moment at the time, using NGINX as a reverse proxy I had SSL and a manageable interface as Mono; Screenconnects built in web engine slowly faded into EOL status and no longer supported modern browsers.

It was time for 19.04 LTS and after attempting upgrade it failed. Not only was I stuck on a Gen1 VM I could no longer update the core OS from 18.04 without destroying SC. So with Connectwise predatory pricing scheme, and my lifetime SC license no longer activating on their servers I could do nothing but wait.

So I did, With 20.04 coming out I wanted to try again. I was finished the migration to encrypted and protected VMs with a slew of other security related modifications the only server out was Screenconnect.

I did the upgrade from 18.04 to 20.04 and as anticipated it broke. This time however I wanted to fix it. First and foremost I saw that the service was starting, but only After I was able to console into the server. SSH was not working. I figured if SSH did not fuction it stood to reason this may be firewall related. After a quick check:

Sudo ufw status

I was confused to find it disabled. After enabling the firewall

sudo ufw start
sudo ufw enable


This completed without issue, and a check of my rules showed they were still in place. I decided at this point to reboot, hoping that maybe this was always the problem. After however, I was greeted with the same problem. This needed to be fixed first for me to proceed. I need the firewall to start with the system. What was odd was that all of the enable commands via systemctl or otherwise did not report an error.
After some digging I managed to find my issue.

sudo nano /lib/systemd/system/ufw.service

Had a line in it regarding firewall start metrics.

Before=network.target

This made no sense, we need the firewall to start AFTER the network comes up so it does not fail and stop.

After=network.target

Done. After yet another reboot the firewall service was working correctly. Now it was time to check on Screenconnect. While installed and intact after the upgrade still was not starting. Thankfully SC is configured to log its own errors.

at ScreenConnect.Program.Main (System.String[] args) [0x00000] in :0
[ERROR] FATAL UNHANDLED EXCEPTION: System.TypeInitializationException: An exception was thrown by the type initializer for libc ---> System.DllNotFoundException: libdl.so
at (wrapper managed-to-native) ScreenConnect.MonoNative+libdlProxy:dlopenPlatformInvoke (void,int) at ScreenConnect.MonoNative+libdlProxy.dlopen (System.Void , Int32 ) [0x00000] in :0
at ScreenConnect.MonoToolkit+MonoDiskNativeLibrary.TryLoadNativeLibrary (System.String libraryPath) [0x00000] in :0
at ScreenConnect.DiskNativeLibrary..ctor (System.String libraryPath) [0x00000] in :0
at ScreenConnect.MonoToolkit+MonoDiskNativeLibrary..ctor (System.String libraryPath) [0x00000] in :0
at ScreenConnect.MonoToolkit.LoadNativeLibraryFromDisk (System.String libraryPath) [0x00000] in :0
at ScreenConnect.NativeLibrary.LoadLibrary (System.String libraryName, System.Type lookInAssemblyWithType) [0x00000] in :0
at ScreenConnect.NativeLibrary.LoadLibrary (System.Type type, System.Type lookInAssemblyWithType) [0x00000] in :0
at ScreenConnect.NativeLibrary.LoadProxy (System.Type type, System.Type lookInAssemblyWithType) [0x00000] in :0
at ScreenConnect.NativeLibrary.LoadProxy[libc] (System.Type lookInAssemblyWithType) [0x00000] in :0
at ScreenConnect.MonoNative+libc..cctor () [0x00000] in :0
--- End of inner exception stack trace ---

Rough. IT looks like it was having some issues with libc, libdl after a quick look around using find I came across broken symlinks in /lib/x86_64-linux-gnu where the files resided. It looked like glibc was updated and the existing links were broken.

SSH made this easy because the broken links showed up as bright red. Time to fix them.

sudo ln -s libc-2.31.so libc.so
sudo ln -s libdl-2.31.so libdl.so
sudo ln -s libz.so.1.2.11 libz.so


After the re-link a reboot for good measure and WE WERE BACK!

20.04 running well and screenconnect letting me touch my machines.

Life is good.

BONUS: If you want colors in your sessions

sudo nano ~/.bashrc

Then uncomment the line

force_color_prompt=yes

Anatomy of a public DNS breakin

Anatomy of a public DNS breakin

Hiya, Today I am going to walk you through discovering and potentially leveraging open DNS servers in an effort to show you why you should be careful with the DNS blocking tools that have steadily become popular. Check it out here.

UART and you gaining root on random hardware

UART and you gaining root on random hardware

Hello, today I hope to explain to you UART. We will take a shallow dive into the world serial device access and what it may mean from a technological and security perspective. 

I am a normal guy that wants to bring as much security information to this forum as I have time to do. I understand that it isn’t really the focus of this site but the more eyes and DIYs that can see it the better. We are in an ever growing technological field, and while gaming is fun there are a lot of moving parts now from the days of original DOOM.

Check it out here.

Pi-Graphs

Pi-Graphs

But not thew way you think. I got bored this evening and while it is nowhere close to completion I decided to install grafana on my rasberryPI B+.

To do this I first downloaded Ubuntu server 19.04 from the Pi site.

From here after the normal install and updates etc it was time to stand it up so I can feel productive later. First and foremost I needed to make sure that I could poll network equipment and pretty much anything that supported SNMP. So lets get that out of the way.

sudo apt install snmp

Now that we have snmp we can probe things, but we aren’t going to get anything we can read so we need the MIBs to translate the info from the various manufacturers.

sudo apt install snmp-mibs-downloader

Now that we have the downloader lets go get the actual MIBs

sudo download-mibs

Sweet, now we need to tell snmp to use them, so lets edit the config.

sudo nano /etc/snmp/snmp.conf

and now lets change the default value to

mibs +ALL

save and exit and cool beans.

Now we have the networking stuff installed so now we need to go grab grafana. Its a seperate repo so we will need to tell ubuntu where to look for it. In this case I dont want betas, so I’ll be using the stable repo.

Lets make sure we have this

apt-get install -y software-properties-common

now we need to make sure we can do https transport just in case.

sudo apt-get install -y apt-transport-https

Lets add the repo now so ubuntu knows where to find grafana

sudo add-apt-repository "deb https://packages.grafana.com/oss/deb stable main"

Ubuntu is going to get mad unless we make sure this repo is legit so lets add the key for it

wget -q -O - https://packages.grafana.com/gpg.key | sudo apt-key add -

wew. Ok now we need to do an update so that ubuntu knows to check that repo when we ask it to install things.

sudo apt update

Now lets install grafana.

sudo apt install grafana

Cool, now we need to start it and set it to start at boot.

sudo service grafana-server start
sudo systemctl enable grafana-server.service

We will need InfluxDB because its what I want to use anyway so we can log stuff. So lets install it.

sudo apt install influxdb

Now, you do need to continue and create a data base in influx with a username and password. I’m stopping here though. Since I’m not sure what I want to do with it yet.

The Grafana default port is 3000 so you should get something like this if you nav to your IP and port 3000.

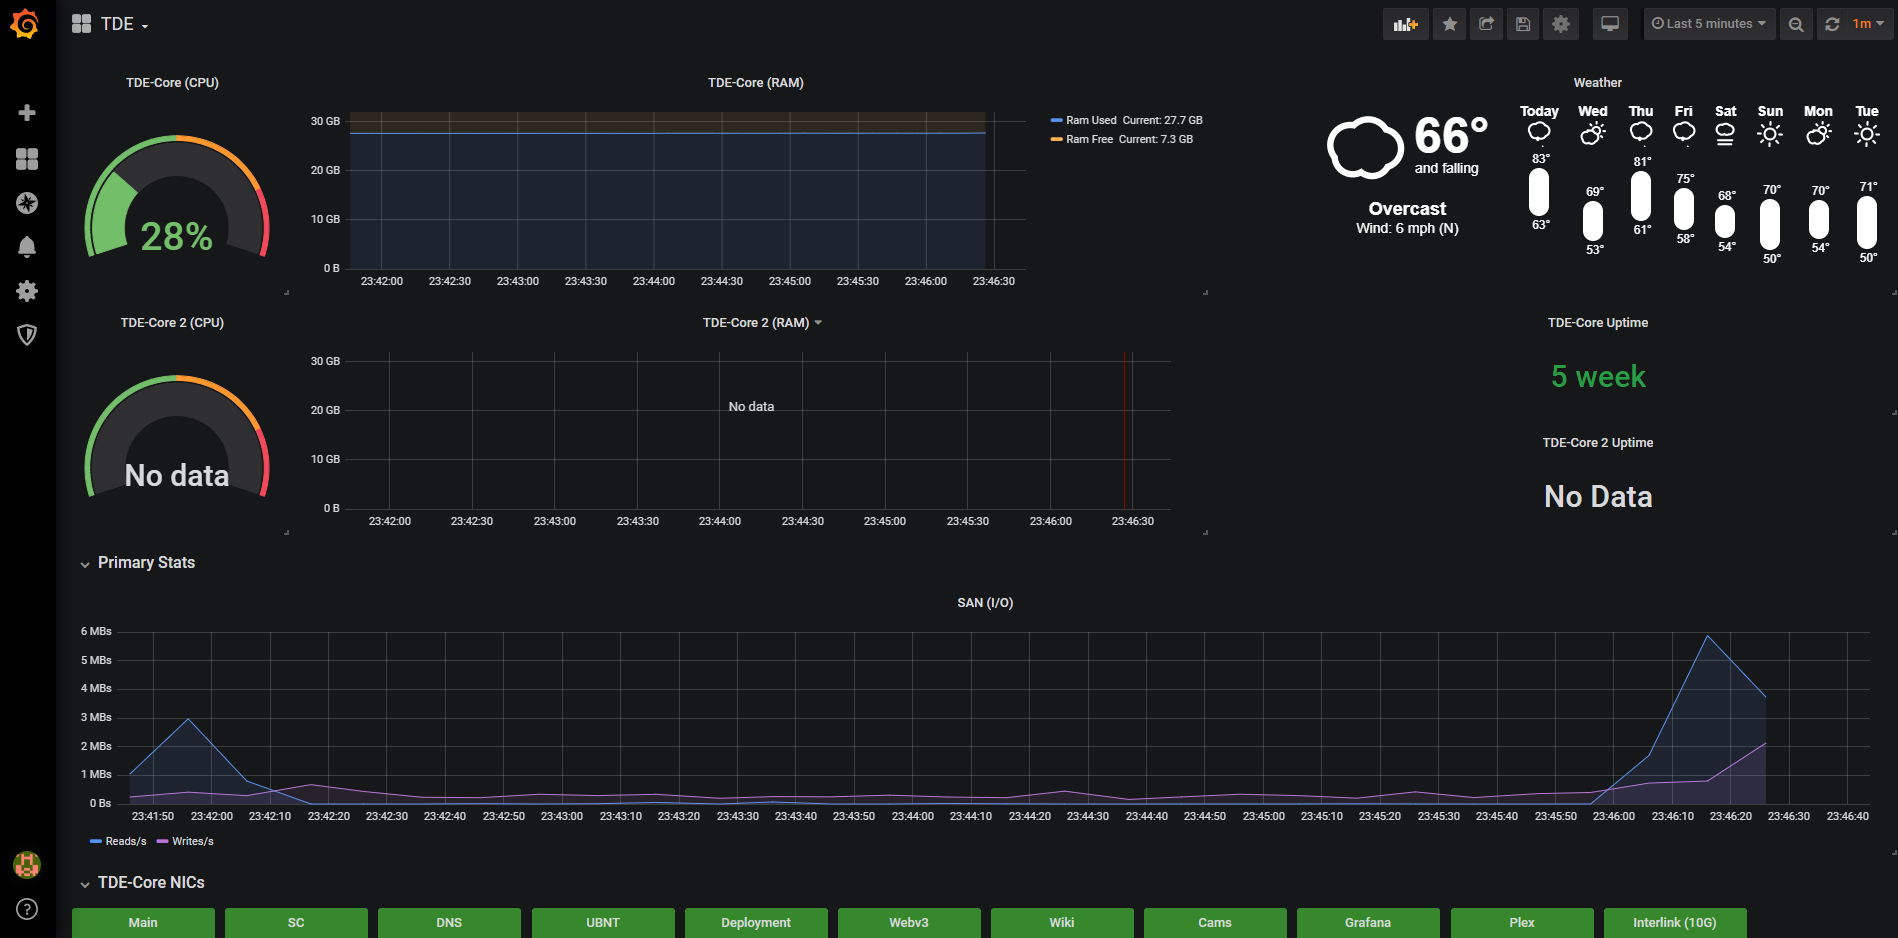
Now I just need to set it up more and play with it. Will be polling stuff for no reason in no time. Here is a peek at my home setup.